


Decoded: an elegant guide to the secrets of barcode mastery
Learning about barcodes is like learning first aid; highly technical, exceptionally specialized, slightly boring and something that isn’t that critical to the day to day – until it is.
At Brandolier, we have seen enough omnidirectional shit hit the fan for an entire lifetime. Two entirely different products tagged with the same UPCs during pre-press (after client approval), particular barcode types masquerading as other similar ones, improper scan-ins due to hidden ASCII characters that have been unwittingly encoded into the barcode sequence, and the King of All Mistakes: databars and UPCs, that simply will not scan because their components have been digitally or physically warped beyond machine-readable comprehension.
Whether you are a designer, a consultant, a small business owner, a bevalc executive, or a director in a cannabis startup trying to ensure you create databars that will work for Canada retailers and provincial boards, chances are you have at some point gone searching for answers about barcodes and been unpleasantly surprised by the obscure and poorly rendered information on this topic. We hope to change that by presenting a clear and concise overview of where barcodes come from, how they work, how to get them, what different types exist, the best practices to heed and pitfalls to avoid when generating and implementing barcodes for your product line.
The birds and bees of barcodes
Mom, Dad, where do barcodes come from? The natural order and origin of these innocuous looking parts of any self respecting professional product seems almost mystical when you start diving into it. Like the Galactic Empire of Star Wars, GS1 just kind of exists as the de facto ruler of the barcode galaxy – omniscient, omnipotent, and accepted as canon. How and why do they control the monopoly on barcode generation? The reality is that like any commerce-driven technology they have a functional history rooted in automation to increase the speed of transactions.
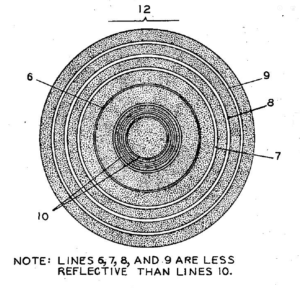 The very first semblance of a barcode was developed by Joseph Woodland in 1948 to allow a computer to easily recognize one product apart from another. While he had the right idea, this original bullseye-shaped mark rendered poorly in print, contained limited information, and ultimately was created before industry was truly ready to accept it. Next up is IBM employee George Laurer, who responded to a 1973 call for innovation by several CPG industry leaders requesting the development of a universal system to track consumer goods. Building on the foundations of Woodland, Laurer refined the idea of a barcode into the familiar rectangular format we recognize today. In the late 70’s, as a result of an emerging need to track and organize how product numbers in this new technology were allocated, the U.S. based Uniform Code Council merged with Europe’s EAN International to form GS1 – the world’s central authority and source for barcodes. OK, wake up! – the history lesson is over. All you need to know is that all legitimate barcodes now stem from the global not-for-profit organization GS1 – directly or indirectly.
You may be thinking “but there are plenty of sites that sell barcodes.” Sure, sites like “buyabarcode.com” and others will sell you bundles of fairly expensive, ready-to-deploy UPCs. Even if you got your codes from a third party like this, most product type barcodes derive from GS1 in some way or other. This is evident in the company prefix number assigned by GS1 and embedded in the “GTINs” of common CPG barcode types. Someone registered a GS1 account, got a prefix, then made all of the barcodes that are available for you to buy at these third party retailers. To help explain this, let’s talk about the components and how they work together.
Barcode anatomy 101
At the core of most common CPG barcodes is a 12 digit Global Trade Item Number or GTIN, which – you guessed it – identifies a single product or packaging/storage variation of a product from any other product in the world. The first set of 5-9 digits in this number is called the company prefix and is determined by GS1. Your decision to register for 99, 999, 9999, or 99999 GTINs (numbers to be made into barcodes) determines the length of your prefix. Either way, once you have a GS1 account, this prefix is yours and uniquely identifies your company globally because it has been reconciled against all other prefixes in the GS1 system.
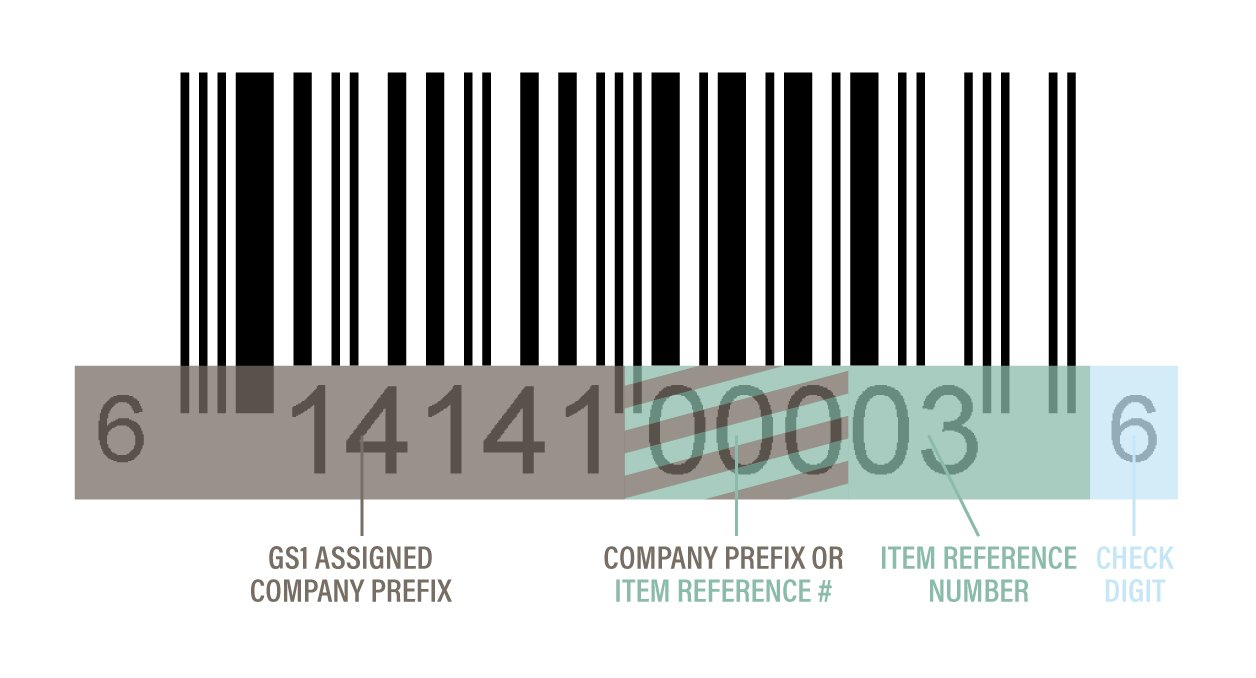
The next set of digits in a GTIN is called the item reference number and is determined by… you! If your company prefix was 8377253 (with 7 digits) this means you opted to make almost 10000 GTINs available to use for your products. Why almost? Because 7 prefix digits + 4 item reference digits (up to 9999) + 1 check digit = 12, the correct number for any legitimate GTIN. How do you choose which numbers to use for your product identifiers you ask? It’s totally and completely arbitrary, however, it makes sense to build logic into your GTIN structures. We’ll talk more about that later or you can jump ahead to this section.
So what the hell is a check digit? It is a single number from 0-9 generated by a complex algorithm computed from the numbers you have selected to combine with your company prefix. The check digit helps with your barcode’s scan in process. They can be computed manually – if you have no life and lots of time on your hands – or you can just use GS1’s online check digit calculator to generate them. Just to be clear, your GTIN is NOT COMPLETE until this component has been added to the digit string. Think of them like the fake cherry on an ice cream sundae – kind of useless but important to ensure that people recognize the sundae as a sundae.
When it comes to additional information beyond the GTIN, larger barcodes will usually contain either application identifier (AI) data, or ANSCII code characters. You’re thinking, “bloody hell, more f*#king acronyms and jargon!?” Sorry, it’s a technical subject. A good example of application identifiers comes from the cannabis industry databar required by Health Canada. These standardized codes identify what information is being conveyed – like expiry date (AI17) or lot number (AI10). ANSCII is a bit more complex, these logistics computer shortcodes are similar to AIs in that they are standardized, however these codes are geared more towards producing specific digital actions from the scan of the physical code. With most typical CPG operations, you will not need to interact with them.
So to recap, the GTIN is made of the GS1 company prefix, the product identifier, and a check digit. You may hear people use terms like GTIN and barcode interchangeably, so always remember, a GTIN can exist without a barcode, but a barcode cannot exist without a GTIN – mostly. Many non-CPG barcodes are made with service ticket or logistics-derived numbers, but since this article is mostly about CPG commerce we will focus on the barcodes that DO use GTINs. And just in case you were thinking about pulling a fast one on GS1, yes, you can make barcodes using ANY 11 numbers that you choose arbitrarily plus the calculated check digit, but there will be no guarantee that they don’t conflict with another product in the market. Imagine your cannabis vape scanning the same GTIN as “Spa Day Barbie”. Not a great look.
The building blocks of barcodes
By now you are wondering, “OK I get the history, but how are barcodes actually generated from GTINs?” This part gets a little technical (yes MORE technical), but basically the human-readable number combinations in your GTIN are transcribed into a set of lines at varying widths that make up the scannable, machine-readable component.
The size and position of the bars (or cells) are determined by a mysterious comic book-sounding thing called the “X-Dimension.” If you are talking about 1D linear scan barcodes like UPC-As, the X-Dimension is the smallest width bar in your barcode’s encoding sequence. All bar and space widths in the code are divisible by the X-Dimension to create a neatly structured sequence. For 2D barcodes like QR codes and data matrices, the X-Dimension is the smallest width AND height of a cell in the code. Databars, which are required by cannabis regulations in Canada, incorporate both types of X-dimensions in their stacked form because the stacked databar incorporates both 1D linear and 2D elements.
When you start thinking about how barcodes are made using X-Dimensions it begins to make sense why UPCs and other linear scan codes can tolerate some warping and still be readable while QR codes can suffer very little warping. For example, shrink wrap on a beverage container will always undergo a degree of warping when it is applied in a heat or steam tunnel during manufacturing. This effect is magnified when you are working with bottles that have curved surfaces or embossing effects. Because shrink film compresses more horizontally than vertically, the best practice is to rotate UPCs 90 degrees so that this extra compression occurs against the negligible height dimension of a UPC and not the more sensitive X-Dimension.
The only other component you need to know about is a yoga-sounding thing called the “Quiet Zones.” These are the blank areas on the left and right of a 1D barcode or the blank perimeter of a 2D barcode. Quiet zones allow a computer scanner enough negative space to properly frame and read the structured information of the code. At minimum, quiet zones should be sized at 9 times the size of the X-Dimension. This means no hyper-cropping you space saving nerds. Let those codes breathe.
Barcode types
Now that you know how a barcode is built, let’s dig into the most common types. This will help give you an idea of what will and won’t be relevant to your packaging While the core of most barcodes is usually the 12-digit GTIN, there are plenty of codes out there which incorporate many more than 12 digits. Digits added after the GTIN core always serve a very specific purpose; the unique purposes and grouping of this additional data contributes to classifying what the barcode type is. Barcodes can also be sorted according to the physical method of scanning: 1 dimensional (1D) or 2-dimensional (2D). This is pretty much exactly what you would expect – 1D codes are scanned with a single linear beam of light that passes over the bar array, 2D codes are registered with an omnidirectional beam of light that passes over the grid array. Here are the common types of codes and their digit lengths.
UPC (Universal Product Code) 
This 12 digit code is the most commonly known format of barcode, probably because they only encode the GTIN – no extras. This code type is the most widely used and appears the most on consumable or more simple CPG products.
EAN (European Article Number)
Remember EAN International from the good old days? This is the format they adopted in tandem to North America’s UPC. As such EAN-13 and EAN-8 formats are largely seen in European products, but are also used commonly by certain businesses like booksellers.
ITF (Interleaved 2 of 5)

These puppies were made for manufacturing and logistics, Code I 2 of 5 is a numeric-only barcode used to encode pairs of numbers. Every two digits acts as a binary pair that generates one symbol. Yikes! This code type is often used for printing directly on cardboard which demands a low amount of detail or resolution.
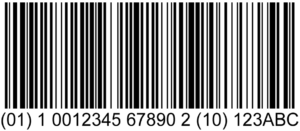
Databar

Truly terrifying in appearance, the mighty databar encodes a product GTIN along with multiple sets of additional relevant information about the product’s manufacture up to 74 numeric or 41 alphabetic characters. Depending on the type of relevant info to be added, these additional segments are tagged with bracketed callout digit pairs called Application Identifiers or AIs. These AIs precede supplementary data segments in databars and are determined by a standardized catalogue. For example, cannabis producers and processors in Canada would need to create databars using AI13 (which signifies packed on date) and AI10 (which signifies LOT#). See, they really aren’t so scary once you get to know them.
Databar stacked 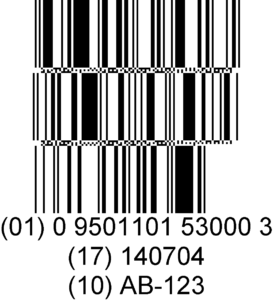
Same shit, piled. Used to condense super-duper long databars, the stacked format relies on tiny pixel-like bits like you would see on a QR code to link wrapped segments of the databar together when they are scanned. They can be stacked in rows of either two or three depending on their set width and how many digits they contain. Despite standard databars being a 1D code type, stacked databars are 2D codes because they utilize both 1D and 2D X-Dimensional elements – psych!
Code 39

This code type can incorporate a ton of data, but is not compact by any means. It is one of the older formats of barcode. It is often used for electronics and healthcare applications. Zzz…
GS1-128
Generally used for case or pallet codes, the GS1-128 encodes long strings of alphanumeric digits, including application identifiers. Canada government and provincial board compliance for cannabis producers requires the use of GS1-128 codes for shipping cases because of their ability to incorporate supplementary information from the databars on their retail units. So why not just use databars for shipping boxes? They are too intricate. In the fast-paced logistics environment you want codes that are big, simple, and scannable from as far away as possible, as fast as possible. The GS1-128 linear scanning code gets this job done well.
Code 128 
Typo? I think not. Essentially the bigger, badder version of the Code 39, this is like the GS1 128 – but not. We witnessed an entire pallet of cannabis products turned around because a helpful employee of the Licensed Producer we were working with wasn’t aware of the difference. Beware, code 128s do not scan in the same way as GS1-128s.
Data Matrix 
The data matrix is the king of encoding massive volumes of info into a tiny space. As 2D codes, they do require more sophisticated omnidirectional scanners. You’ll find these types of codes on all kinds of complex commerce transaction items like airline boarding passes.
QR (Quick Response) Codes

Essentially a slightly less information-dense data matrix. QRs had a heyday in the early-2000’s, dropped out of fashion, and have since been re-adopted by many marketers as QR-scanning became more of a common place feature in smartphones. QRs were purpose built to encourage cross-media or cross-platform consumer interaction. Try the one to the right if you are reading on a desktop, it takes you to our handy tradeshow planning tool. You know, for when we can actually do tradeshows again…
As you can see there is a vast array of barcodes at your disposal – more even than what is listed here. Choosing the right barcode types for your product line is essential; you should use formats that generate maximum efficiency and scalability – unless you are a licensed producer of cannabis in Canada, in which case Health Canada will be telling you which barcodes are most efficient for your business. Psst, learn to love databars.
Avoid barcode mistakes
What you are about to hear is grade A, top quality intel gleaned from hard lessons in the CPG industry. Grab a bag of popcorn and a notepad.
Know how the substrate will affect the barcode
Though barcodes can certainly be scanned on a screen, they are by far most commonly used when printed on physical media. Before applying one to a label or piece of packaging, know how it will interact during the manufacturing process. Shrink sleeves heavily contract laterally, so place UPCs at a 90 degree angle to this compression. Inkjet applicators can render poorly on uncoated paper stocks so consider an oversticker if size is an issue.
Never assume that if it came from the printer, it must be perfect
A few years back I witnessed a situation where a set of nutraceutical labels (around 7 SKUs) were approved by the client during pre-press. Somewhere between client approval and pre-flighting the printer accidentally substituted the barcode from one SKU into another as they finalized the files for production. Not much you can do when this happens other than asking for a re-run but just know that nobody is perfect, including your trusted printer.
Never assume that if it came from GS1, it must be perfect
This is a good one. We had a cannabis shipment show up at the provincial distributor on time and fulfilled in its entirety, only to learn that the warehouse was not able to properly scan the GS1-exported databars on the retail units. Panic ensues. Turns out an anomalous ASCII Code character was showing up in the lot#. Upon further inspection it appeared that the code 29 GS (Group Separator) was showing up just after a set of alpha characters in the lot code and then dropping the remaining numeric ones. After a battery of tests we determined that the only databars that behaved properly were A) ones with numeric-only lot #s, B) ones with the alpha characters at the end of the lot #, and C) ones exported from other platforms (Bartender, Zebra Designer). Somehow, databars with alpha-forward alphanumeric lot #s, exported from GS1’s online system were inserting a hidden character into the barcodes during encoding. GS1’s own codes were faulty!! We raised this issue with a contact at GS1 and you know what the response was? Nothing. Total radio silence. Bigger doesn’t always mean better. The story has a happy ending. We worked out an exception with the distributor for this one shipment and happily learned our lesson.
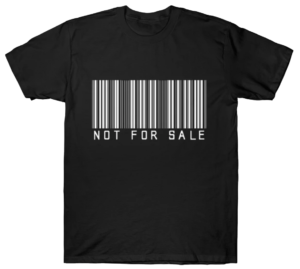
Don’t invert barcodes
If you were thinking about attempting to pull some kind of clever social commentary, or hipster packaging differentiator like making barcodes with white bars and black negative space, they do not work inverted. Except as an art installation or t-shirt.
Barcode Best Practices
Sizing
For UPCs the recommended standard size is 1.469” x 1.02” or around 37mm x 26mm. Practically speaking they can be sized down on most substrates by approx. 80% to 1.18” x 0.82” or 30mm x 21mm. For space saving purposes, it SHOULD be OK to crop the height of your barcodes a bit (making them shorter). If you do this, ensure that you crop from the top not the bottom and aren’t compressing your barcodes to achieve the space savings – this would hide or warp the human readable code component and potentially make your codes unscannable.
Use dark colours – if not good old reliable black
Black is so last century, right? Actually, contrast in barcodes is always sexy, so in this regard black will always win the day. Venturing into coloured codes to match a label’s style or colour palette is possible and can look cool but you need to ensure whatever you select will produce enough contrast for scan guns. Stick with dark colours like dark blues or greens and always place them on a light backdrop. Avoid warm colours like red or orange as they have a high chance of failing unless they are nearly black.
Build a system for your GTINs before making barcodes
Once you sign up for a GS1 account, it is absolutely essential to build a structure for your GTINs to keep things organized and logical. This is especially important for obvious reasons, long strings of numbers can get confusing and the more logic you can build into them that provides information at a glance, the better.
For example, say you are a Canadian cannabis LP and just purchased access to 9999 barcodes. By the way, if you ARE a Canadian cannabis LP, you might find that our NNCP Submission Planner and Excise Tax Calculator can come in handy as you advance in your product development pipeline. I digress, back to the GTIN system. Let’s say your company prefix is 1234567. You want to produce multiple sets of cannabis products: flower, vapes, topicals, and tinctures. One smart way of planning for this is to set aside 999 GTINs for each product category, then dividing each of these sets into thirds (or whatever makes sense for your product mix) for separate product lines or brands within the category. Using this method, the item reference number ranges would be as follows:
• Flower 000-999
• Vape 1000-1999
• Topicals 2000-2999
• Tinctures 3000-3999 and so on.
Within the vape category you might have Hyperdrive Labs, HighEnergy Vape, and GoodVibes as your brand names (these are theft-proof BTW as they all convey positive mental states/benefits and would never be allowed by Health Canada!). Let’s continue the example with Hyperdrive Labs and assume that it occupies GTINs 1000-1333. Now that you’ve allocated your categories, you should allocate segments for different packaging levels.
• Hyperdrive Labs retail unit GTIN 1000-1099
• Hyperdrive Labs master case GTIN 1100-1199
• Hyperdrive Labs pallet GTIN 1200-1299
This arrangement now gives you the possibility of 100 SKUs for Hyperdrive Labs while covering you off on 3 potential layers of packaging. It also allows you to easily associate a GTIN at any packaging layer with its corresponding SKU variety. For example:
• Hyperdrive Labs retail unit GTIN for Mac-1: 12345671003X
• Hyperdrive Labs master case GTIN for Mac-1: 12345671103X
• Hyperdrive Labs pallet GTIN for Mac-1: 12345671203X
Note: X is where the check digit would go once calculated
As you can see all three levels of packaging for Hyperdrive Labs’ Mac-1 SKU have item reference numbers that contain a 3 as the second last digit and increase by 100 for each layer of packaging. This allows for added clarity and recognition without even having to look up the GTIN description.
Closing thoughts
Despite appearing relatively innocuous and commonplace at first glance, there is a lot riding on the little rectangular stripes that power CPG commerce. Nobody wants to spend thousands on packaging do-overs or to have a shipment denied due to a technical problems that could have been prevented with a little extra knowledge and care.
Hopefully this guide has demystified the subtle complexity of barcodes and will help you to avoid issues, headaches and PTSD down the line. If you do have further questions about your barcoding system feel free to drop us a line. Barcodes really are most fun when decoded with a friend!
